


It was my turn to create a designer paper technique for the month of July over at The Latest Trends Mixed Media Group. Because the kids are out of school and/or grandchildren will be visiting, I wanted to design a background paper that the kids could do right along with mom or grandma.
I took an age old technique and tweaked it a bit using bleeding tissue paper, punches and a variety of cardstock and embossing folders.
SUPPLIES:
Colored tissue paper available at most craft stores – the tissue when wet releases the color onto the card
Heavy watercolor paper (I used 140 lb. rough) and a light weight watercolor paper
Glossy white card and a tag
Variety of craft punches – whatever you have on hand. If you don’t have punches, you can tear pieces of the tissue paper into small pieces.
Embossing folders (I used Cuttlebug because I had them available.)
Sandpaper block
Chalk ink of your choice and sponge to apply color
Water filled mister
1)Punch out a variety of designs or tear tissue into small pieces. I found that I could punch a variety of colors at one time. If you find the tissue hanging up in your punch, layer it between a folded sheet of wax paper.
2)Spray the watercolor card with a mist of water, and place some of the shapes on top. You may have to push the edges down so that they adhere to the card or re-mist with water. If you use too much water the colors will blur and not leave a distinct design. Don’t worry it makes for a great effect. When dry, brush off the tissue and use the card as is or further embellish using paints, inks or embossing folders.
* * * * *
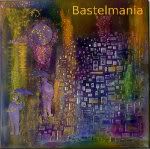
I started with a 140 lb rough watercolor paper(above photo)and put down a large amount of punched out shapes. When dry it looked horrible so I decided to run it through an embossing folder. I started with a DIAMOND design, added a very light violet chalk ink to the raised diamonds using a sponge. I was still not happy so I ran the card through a second time using the NUMBER folder, sanded off the embossed areas and what started out as horrible turned into my favorite. The heavy watercolor card when sanded feels like velvet.
The second card started out with a yellow watercolor wash, thanks to my friend Barb, on a lighter weight watercolor paper. I put down punched designs in shades of green and orange tissue. When dry I ran it through the TEXTILE embossing folder and sanded off the raised embossing leaving the white design.
In the group photo is a glossy card to show you the effect because glossy paper is not absorbant and you get a more subdued effect which you could embellish further if desired.
I also created a regular manila tag. The tag absorbed the colors really well. After I embossed it I used a light brown chalk ink to highlight the SCRIPT embossing and card edges. This tag will hang the opposite direction because I placed it in the folder upside down.


2 comments:
These are gorgeous, Carolyn!!
They are fabulous! The number one is my favorite but I can't believe all the work that went into it.
Post a Comment