

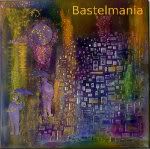
For now I wanted to show off my play time making these terrific backgrounds. Some were embossed first, color applied to the plate and then the tag face down on the plate to pick up the color. For the one with the butterflies, I used the remnants of some punched out butterfly elements and placed it on the Gelli plate to pick up some of the color, and then I placed the tag card down to pick up the color remaining. This was my all time favorite as the remnant picked up some of the coloring leaving the areas untouched where the butterflies had been removed. (Hope that is more clear than mud.)
In any event I had so much fun that I will link this to LETS PLAY at http://acolorfuljourney.com. It was so much fun that I had to order me a plate to play more. I need some fantastic backgrounds for my journal.


5 comments:
LOL! Right before I saw this, I sent you an Email saying my J. had gotten me a GelliPress plate!!
You came up with some really beautiful effects at DIVAs ~ I look forward to a play date ASAP!
Hugs ~
b
Oooooooooooooooooooooooh, Carolyn, what gorgeous Gelli prints, you really had fun. LOVE what you have made, and looking forward to seeing what you make with them. Have fun! BIG hugs, Valerie
Oh Carolyn! They are absolutely gorgeous. I've been wondering about the gelli plates and now want to know more. I will have to investigate. Looking forward to seeing more. When will you get yours to play with at home? hugs, Donna
thanks for the ideas going to try it with embossed folders never dont that before think you could do it in reverse ie emboss afterwards, and ink to highlight .. so will give it a try!
Thanks so much for sharing.
Shaz in Oz.x
{Shaz in Oz – Calligraphy Cards}
Here is my link if anyone wants a homemade one
it doesn't go off mine is three years old.
Shaz in Oz.x
{Shaz in Oz – Calligraphy Cards -How to Make a gelli plate}
Post a Comment