


(The samples are my interpretation of techniques, not necessarily new ones created by me.)
SUPPLIES:
Panels from a cereal box or similar thin cardboard with a smooth finish
Left over water-base paint from the garage. (I used an acrylic flat in white with a light tint.)
Mod Podge matte
Foam brushes, brush for gesso or clear glaze and paper towels
Text (newspaper, telephone book, dictionary or novel)
Acrylic Paints and iridescent interference paints (I used Ranger and Folkart Paints & Sonja’s iridescent)
Rubber stamps to coincide with theme – bold images work the best.
Black StazOn or other permanent waterproof stamp pad (India Ink Black worked the best for me.)
White Gesso
Clear Glaze (optional)
(Note: All of these items can be substituted with brands of your choice.)
1) Trim cardboard leaving a nice flat surface.
2) Cover printed side with household paint to cover printing and let dry overnight
3) Tear strips of text in uneven sections and adhere with Mod Podge.
4) When dry, apply one or two coats of white gesso to soften the look of the text. You can wipe off some of the gesso from the text if you desire. DRY THOUROUGHLY
5) Select one main image and stamp with permanent ink randomly down the prepared card covering some of the text.
6) Use additional stamps for variety and to complete your theme.
7) Add color covering some of the text and images, wiping off any color that is not desired using a wet paper towel or wet wipe.
8) For variety, put some interference paint in a pan or on a craft sheet and use it like a stamp pad and stamp the image randomly. (I stamped in a rather thick layer which left some texture on the finished piece.)
REMEMBER TO CLEAN STAMP IMMEDIATELY AS PAINT DRIES QUICKLY
9) When the completed sheet is dry. You have two choices
a. Add gesso using a dry brush effect. Dip your brush in the gesso and then swipe a paper towel before you apply to the prepared cardboard. You can cover parts of the images and text or all as desired. (You can wipe off just sections, too.) Let dry.
b. OR, in place of gesso, brush on a coat of clear glaze.
c. LET DRY OVERNIGHT.
10) ou are now ready to cut it into ATC cards or use it as a background for a journal or for cards.
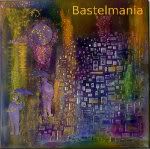
NOTE: For the bamboo sheet, I used the gesso technique and for the bird house and floral pieces I omitted the gesso and coated both with clear glaze.

I made several cards from the backgrounds and still have a stack of cards ATC size for future use. I used the glaze to seal the background used for the booklets because I thought it would be more durable.
I hope you will try this technique and share your results on your blog.


2 comments:
These look awesome!
Carolyn, Great way to go green ,these are just stunning! You should bring them Monday. I'd Love to see them in person!
Post a Comment